


How to Install Laminate Flooring

Installing laminate flooring is a simple project. The hardest part may be deciding which laminate style to choose! They're also available in a wide range of styles and colors that match most home decorating schemes. Laminate is a great choice for busy households — it's durable, affordable, and easy to clean, making it an excellent choice for homes with young children or pets. The surface of this flooring can be made to look like wood, plastic, stone, or tile to fit in with almost any decor.
The top layer is printed with a design that imitates the look of real wood. This flooring can be installed over existing floors without removing them first. Installing this flooring can be done in one day if you work efficiently and use the right tools.
In comparison to engineered and solid hardwood, they have tongue and groove so you will have to nail the floor or glue it down. The laminate flooring locking system allows the planks to click-lock together and stay afloat and not attached to the substrate subfloor or concrete slab. The advantage of the laminate floating floor is that it hides the imperfection and unevenness on the subfloor, and it’s very easy to take up when you are replacing it.
Floating flooring is installed with a floating underlayment and does not need glue or nails. The only thing you'll need for this installation is an electric drill with a paddle bit attachment to boreholes in the underlayment and the subflooring. The underlayment is made of foam material and plastic, and the underlayment helps protect the laminate flooring from moisture rising up from underneath. which allows it to expand and contract as the wood expands and contracts due to humidity changes. It is easier to install than tongue and groove floors because there are no grooves to cut so that they can be used over existing floorings such as tile or linoleum without any preparation work required. However, floating floors aren't suitable for all projects because they don't provide the same stability level as tongue and groove.
It has a locking system that keeps the planks locked together and makes them stronger than tongue and groove wood that could gab and move with high moisture. You can expect your floors to last longer because they won’t flex or warp due to poor installation methods like gluing down and nailing down floors when exposed to moisture over long periods (such as when cleaning spills). This method is best for areas with lots of traffic because it provides more stability.
There are several things to consider when choosing a laminate floor:
How much to install laminate flooring (Price)
These floors are usually less expensive than solid wood floors, making them attractive for homeowners on a budget. However, the price difference between low-end and high-end laminated products is not very significant. These floors cost anywhere from $2-$10 per square foot, depending on the thickness and quality of your product, and $8 to $15 per square foot for the work and material. The higher-end products tend to be more durable than lower-end products, so they may not need replacing as often as lower-quality products. The best way to save money on this flooring is by buying it in bulk at a home improvement store or warehouse club.
Durability
Because it is made up of several layers, it can withstand heavy traffic better than other flooring types, such as hardwood or tile. It's still recommended that you wear shoes with rubber soles when walking on this flooring. They can also withstand scratches and other forms of damage that would ruin real wood floors in no time at all. If you have pets or children at home, this makes them an excellent choice because they won't need replacing every couple of years like many types of floors do. However, if you're installing this in high-traffic areas such as kitchens or living rooms, you may need to replace it sooner than expected due to excessive wear and tear.
Plank size
The floors are made up of smaller pieces called planks (also called boards). The size of these planks determines how many pieces you need for each room, which affects the total square footage of your project cost. Smaller planks have more seams between them, so they may be less expensive but aren't as durable as larger planks with fewer seams between them. Large planks also tend to have fewer seams to last longer than smaller ones with more seams.
Materials you'll need
Laminate flooring planks or panels are typically sold in bundles of 48 or 100 square feet (4 square meters). The size of each bundle will vary depending on the type of flooring you purchase. For example, some manufacturers sell their planks in packages of 12 square feet (1 square meter), while others offer bundles of 16 square feet (1.5 square meters) or even 24 square feet (2 square meters).
Nail gun with 1-inch nails that fit your specific type(s) of flooring (some brands require nails that are 1⅝ inches long, while others require ⅞ inch nails). Many nail guns come with an adjustable depth gauge so you can set it for whichever thickness your planks require. If yours doesn't have this feature, buy one separately at any hardware store.
You'll need a hammer, Head screwdriver (or power drill), flat head screwdriver (or power drill), utility knife, chalk liner, vacuum cleaner, measuring tape, and leveler.
Tips to keep in mind before installation
Familiarize yourself with your tools before starting your project. Make sure all of the tools are in good working order before beginning installation.
Before installing your flooring, make sure that your subfloor is stable and dry. If you're installing the floor over an existing hardwood floor, remove any tack strips (the nails or staples that held down the existing carpet or vinyl) before laying down your new flooring.
It's important to know how many square feet of laminate you will need and whether or not it will be underlaid as well. If there are any areas where the subfloor isn't level, those areas should be filled in with a leveling compound before laying down the laminate flooring so that there are no dips or rises that could cause problems later on walking across it.
When installing these floors, make sure to leave about 1/4 inch clearance around all walls so that there isn't any interference when cleaning underneath them later on down the road! Also, don't forget to use a dust mask and safety goggles when working with this material, as it can cause allergic reactions.
How to install laminate flooring (Process)
Your laminate wood flooring should sit in the room for at least 48 hours prior to installation. This allows the moisture from the glue to dissipate and prevents any curling or warping of the boards after installation.
If your subfloor has been damaged by water or is otherwise unstable, add a layer of plywood before installing the laminate flooring.
Remove any existing carpeting or padding and baseboards. Be sure to check with your manufacturer for exact specifications on this step, depending on the flooring brand you're installing.
Use a chalk line to mark where each plank of laminate will go; start by marking the center point of each room (usually at one wall). Use a level to check that both ends of each plank are level with each other before installing them (if they aren't already).
The next step in installing your laminate wood flooring is to lay out the planks. You'll need two people to help you move the boxes around the room to do this. Once you have them lined up in their final position, check that they're all level with each other by using a level screwdriver or a laser level tool.
Trim door jambs with a utility knife and straightedge to ensure a snug fit between flooring and framing members such as joists or subflooring. Measure the gap between the bottom of your door jamb and your old carpet or pad to do this. Then cut a piece of plywood or particleboard that size--you might also need to cut some angles if you're working with an angled threshold. Next, screw this plywood onto each side of your door jamb at the top edge, where it meets your new laminate flooring. This should help cover any gaps between your door jamb and new flooring, so there aren't any gaps between pieces when you install it later on. Use caution when working within walls and other enclosed areas where dust can easily settle on top of installed products; this can cause damage to newly laid surfaces over time from repeated dirt build-up on top of laminated surfaces that are not easily cleaned off.
Moisten the floor with a damp mop or sprayer and let it sit for 30 minutes before installation begins. This helps prevent squeaks later on when walking on the floor.
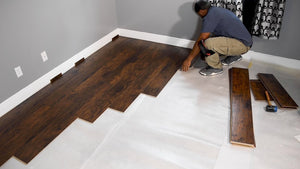
Begin installing laminate wood flooring by placing boards around the perimeter of the room first, then filling in each wall with additional planks until you reach the middle of the room (or desired spot), where all boards will meet up together at one point to form a seam between two pieces of flooring that meets up at 90-degree angles with one another (see image below). This allows for fewer seams between boards installed over the top of one another, which reduces the risk of gaps forming between them later on after installation has been completed!
- Amadou Bah